Abrasive Blasting: Sa 1 vs Sa 2 vs Sa 2.5 vs Sa 3 Explained
The four ISO 8501-1 Sa grades — Sa 1, Sa 2, Sa 2.5, and Sa 3 — define how clean a steel surface must be after abrasive blast cleaning, and choosing the right one is one of the most consequential decisions in any coating specification. Specify too light a grade and the coating adheres poorly or fails early; specify too aggressive a grade and the project absorbs unnecessary blasting time, abrasive consumption, and cost without any corresponding gain in coating performance.
This guide breaks down exactly what each Sa grade means, how to identify them visually in the field, how they translate into real blasting time and cost, and which grade fits which service condition. It builds directly on the equivalence tables in our ISO 8501 vs SSPC vs NACE comparison and focuses specifically on the four abrasive blast grades that make up the bulk of real-world coating specifications.
This article focuses on the four ISO 8501-1 blast cleaning grades (Sa 1 through Sa 3) for carbon and low-alloy steel. Hand and power tool grades (St 2, St 3) and initial rust grades (A, B, C, D) are covered in our companion surface preparation standards article.
The Four Sa Grades at a Glance
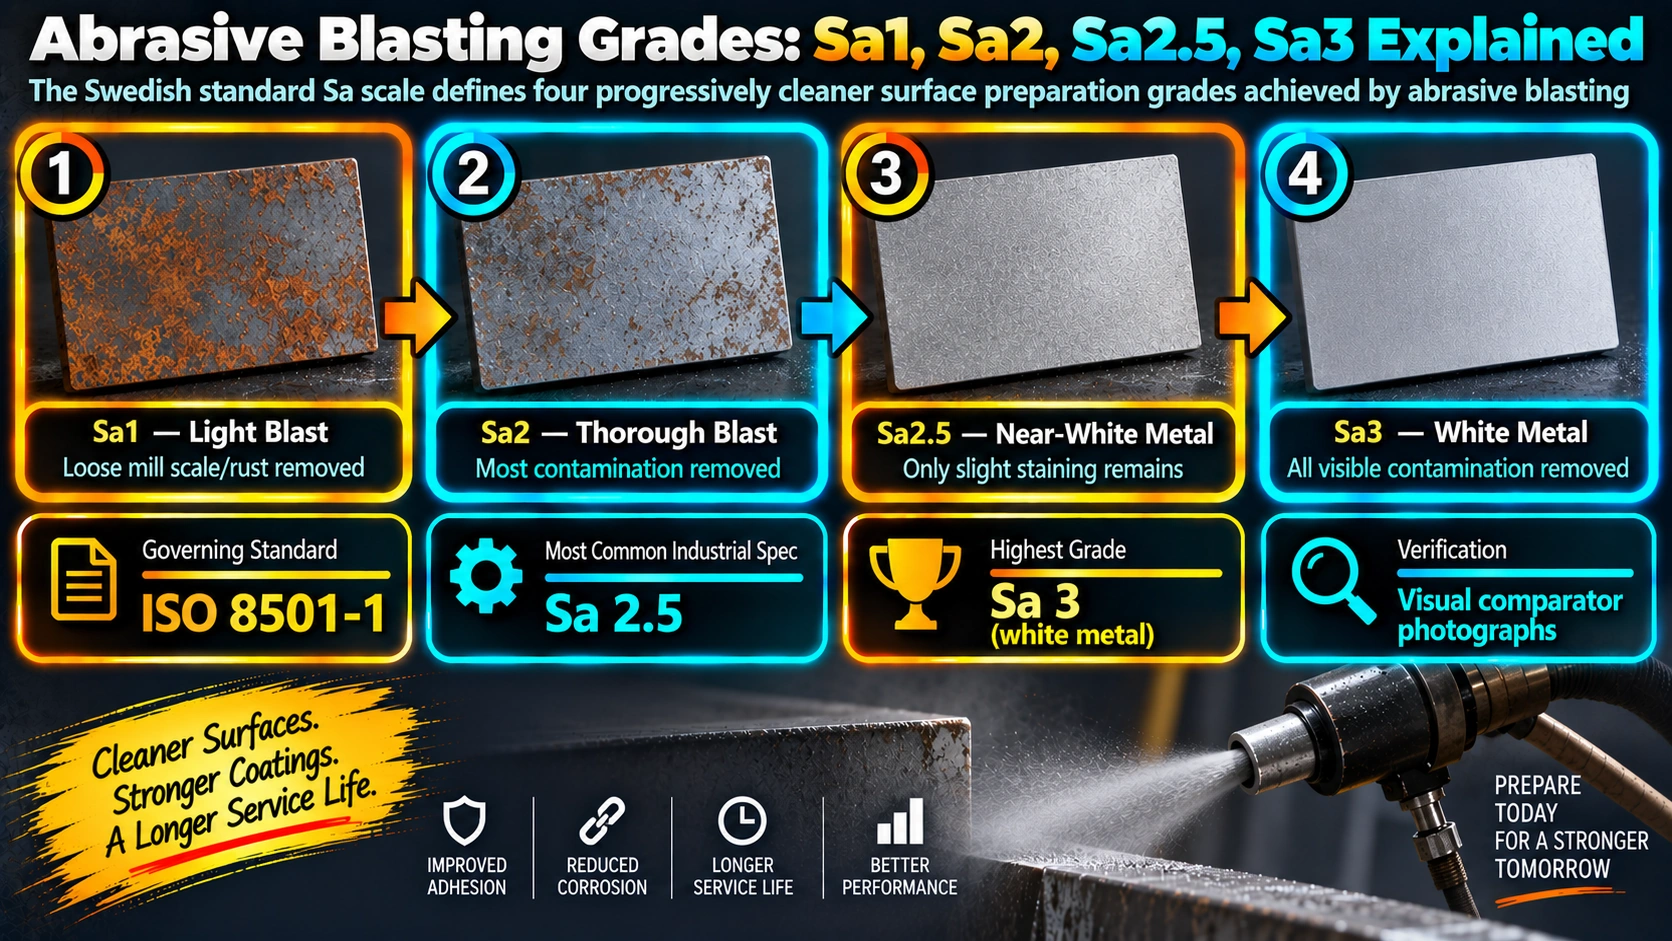
| Grade | Common Name | SSPC / NACE Equivalent | Visual Result |
|---|---|---|---|
| Sa 1 | Light blast cleaning | SP7 / No. 4 | Loose mill scale, rust, and paint removed; tightly adherent material remains |
| Sa 2 | Thorough blast cleaning | SP6 / No. 3 | Nearly all mill scale and rust removed; mottled grey-brown surface with light residue |
| Sa 2.5 | Near-white metal blast | SP10 / No. 2 | Mostly uniform light grey; only faint staining on up to 5% of any 600x600mm area |
| Sa 3 | White metal blast | SP5 / No. 1 | Uniform metallic sheen; completely free of scale, rust, and foreign matter |
Sa 1: Light Blast Cleaning
Sa 1 removes loose mill scale, loose rust, and loose foreign matter using a light, fast blast pass. It is the lightest of the four grades and leaves tightly adherent material in place, which means it is rarely specified as a final coating preparation grade on its own. Its main uses are as a sweep-blast pretreatment ahead of duplex systems over galvanizing, or as a light cleaning pass before a more thorough blast grade where heavy loose scale needs to be knocked off first.
Sa 2: Thorough Blast Cleaning
Sa 2 removes nearly all mill scale, rust, and foreign matter, leaving only tightly adherent residues that cannot be lifted with a putty knife. The resulting surface has a mottled grey-brown appearance rather than a uniform grey, since scattered patches of tightly bonded oxide remain visible. Sa 2 is a reasonable minimum for general atmospheric exposure coatings on structural steel where the coating system’s own barrier properties, rather than substrate perfection, do most of the corrosion protection work.
Sa 2 is generally not accepted for immersion service, offshore structures, or any coating system whose data sheet explicitly calls for near-white or white metal preparation, since the residual tightly adherent scale can act as a corrosion initiation site once coated over, particularly in wet or cyclic-wet environments.
Sa 2.5: Near-White Metal Blast Cleaning
Sa 2.5 is the workhorse grade for industrial and marine atmospheric coatings and is the grade most frequently referenced by name in the field, often shorthanded simply as “near-white.” The standard permits only slight staining, shadows, or discolouration, covering no more than 5 percent of the surface area in any 600 mm by 600 mm inspection square, with the remainder showing a uniform light grey blasted appearance. This is the grade equivalent to SSPC-SP10 and NACE No. 2, and it is the default minimum called out on the majority of oil and gas, power generation, and offshore fabrication coating specifications.
When checking Sa 2.5 compliance, use a systematic grid pattern across large panels rather than spot-checking only the easiest-to-reach areas, since blasting operators naturally tend to under-blast corners, weld toes, and restricted-access geometry compared to open flat surfaces.
Sa 3: White Metal Blast Cleaning
Sa 3 is the most stringent grade, requiring complete removal of all mill scale, rust, coating, and foreign matter, leaving a uniform metallic sheen across the entire surface with zero permitted staining. Achieving Sa 3 typically requires significantly more blasting time than Sa 2.5, because the final small percentage of stubborn residue in pits and crevices is disproportionately slow to remove compared to the bulk of the surface. Sa 3 is generally reserved for critical immersion service, storage tank interiors, splash-zone structural members, and specialty linings where any residual contamination risks rapid coating failure.
Specifying Sa 3 as a blanket requirement when the coating system only calls for Sa 2.5 adds real cost and schedule risk without a corresponding performance benefit. Always confirm the minimum required grade against the specific coating product’s technical data sheet rather than applying the highest grade as a default “to be safe.”
Blasting Time and Cost Comparison
| Grade | Relative Blasting Time* | Relative Abrasive Use* | Typical Use Case |
|---|---|---|---|
| Sa 1 | Baseline (fastest) | Lowest | Sweep blast, pre-clean pass |
| Sa 2 | ~1.3-1.5x baseline | Moderate | General atmospheric structural coatings |
| Sa 2.5 | ~1.6-2.0x baseline | Higher | Industrial, marine, offshore atmospheric |
| Sa 3 | ~2.2-3.0x+ baseline | Highest | Immersion, splash zone, critical linings |
*Approximate relative figures for planning purposes only; actual time and consumption depend heavily on initial rust grade, steel condition, abrasive type, and equipment used.
Equipment and Process Overview
Selecting the Right Grade by Service Condition
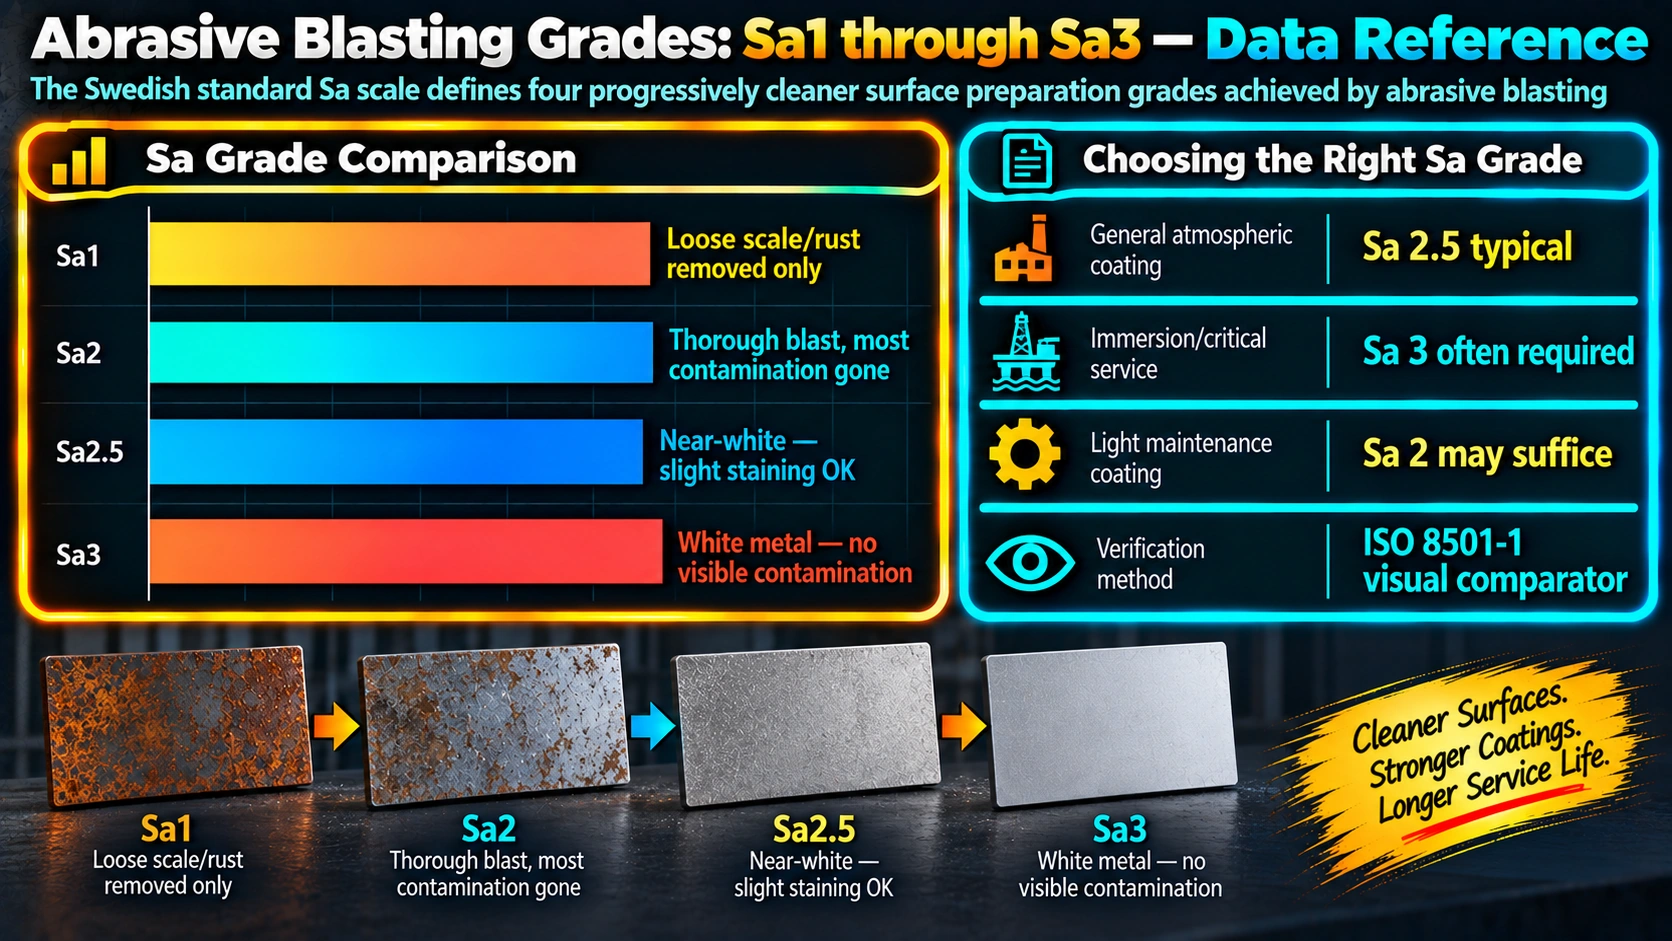
| Service Condition | Recommended Minimum Grade |
|---|---|
| Mild indoor atmospheric, non-critical | Sa 2 |
| General outdoor structural steel | Sa 2.5 |
| Offshore and marine atmospheric structures | Sa 2.5 |
| Storage tank interior, immersion service | Sa 3 |
| Splash zone, tidal zone structural members | Sa 2.5 to Sa 3 (confirm with coating data sheet) |
| Buried pipeline with cathodic protection | Sa 2.5 |
Achieving the correct Sa grade does not automatically guarantee the correct surface profile depth. Both must be verified independently — see our surface profile and anchor pattern measurement guide for replica tape and digital gauge procedures.
Common Field Mistakes
- Comparing against memory instead of reference photographs: ISO 8501-1 comparison should always use the physical or laminated reference photo set under adequate lighting, not an inspector’s recollection of “what Sa 2.5 usually looks like.”
- Under-blasting restricted-access areas: Weld toes, back-to-back angles, and bolted connection faying surfaces are commonly under-prepared compared to open plate.
- Ignoring re-blast after a rain delay: Flash rusting during a weather delay between blasting and coating can drop a Sa 2.5 surface back toward Sa 1 condition within hours in humid climates.
- Not verifying soluble salt and dust levels separately: A visually acceptable Sa 2.5 surface can still fail contamination testing; grade and cleanliness testing are separate checks, both required.
Blast cleaning should always follow completion of mechanical testing and NDT sign-off on welded joints, since blasting removes as-welded surface texture that inspectors may need for visual re-examination, and grinding marks introduced during blast prep can mask surface-breaking indications if sequenced incorrectly.
Recommended Reference Material
ISO 8501-1 Photographic Reference Standard
Official laminated photographic comparison set for grading Sa and St blast cleanliness in the field.
View on AmazonCoating Inspector Field Handbook
Covers blast grade identification, profile measurement, and coating QC hold points for site inspectors.
View on AmazonAbrasive Blasting Equipment and Nozzle Kit
Reference on blast pot setup, nozzle selection, and standoff distance control for consistent results.
View on AmazonSurface Profile and DFT Combo Gauge Kit
Combined profile and dry film thickness gauge kit for post-blast and post-coat inspection.
View on AmazonDisclosure: WeldFabWorld participates in the Amazon Associates programme (StoreID: neha0fe8-21). If you purchase through these links, we may earn a small commission at no extra cost to you. This helps support free technical content on this site.
Frequently Asked Questions
What does Sa 2.5 mean in blast cleaning?
Sa 2.5 under ISO 8501-1 means near-white metal blast cleaning, where the surface is free of oil, grease, dirt, and nearly all mill scale, rust, and old coating, with only slight staining permitted covering at most 5 percent of any 600 mm by 600 mm inspection area. It is the most commonly specified grade for industrial and marine atmospheric coating systems and corresponds to SSPC-SP10 and NACE No. 2.
What is the difference between Sa 2 and Sa 2.5?
Sa 2 (thorough blast cleaning) allows tightly adherent residues of mill scale, rust, and coating to remain, giving the surface a mottled grey-brown appearance, while Sa 2.5 (near-white metal blast) requires nearly complete removal with only light staining permitted over a small percentage of the surface, giving a mostly uniform light grey appearance. Sa 2.5 requires more blasting time, more abrasive consumption, and tighter inspection tolerance than Sa 2.
Is Sa 3 always better than Sa 2.5?
Not necessarily for every application. Sa 3, white metal blast cleaning, achieves complete removal of all mill scale, rust, and foreign matter with a uniform metallic sheen, but it costs significantly more in blasting time and abrasive consumption than Sa 2.5. Most coating manufacturers only require Sa 3 for critical immersion or splash-zone service, and specifying it where Sa 2.5 would suffice adds cost without a corresponding performance benefit.
How can you visually tell Sa 2 from Sa 2.5 in the field without reference photographs?
Sa 2 typically retains a mottled or streaky appearance with visible dark residue patches from adherent scale or rust, while Sa 2.5 shows a mostly uniform light grey blasted surface with only faint, scattered staining. In practice, inspectors should always compare against the official ISO 8501-1 photographic reference set under adequate lighting rather than relying on memory, since lighting and steel condition can make grades look closer than they are.
What abrasive types are commonly used for Sa 2.5 blast cleaning?
Common abrasives for Sa 2.5 blast cleaning include angular chilled iron grit, steel grit, garnet, and aluminium oxide for open blasting, and various expendable abrasives such as coal slag or copper slag where recycling is not practical or local environmental rules restrict certain abrasive types. Abrasive selection affects both the achieved surface profile depth and blasting productivity, not just the cleanliness grade.
How much does blast grade affect coating cost and schedule?
Moving from Sa 2 to Sa 2.5 typically increases blasting labour and abrasive consumption by a moderate margin, while achieving Sa 3 white metal blast can significantly increase both time and abrasive cost compared to Sa 2.5, since the final increment of cleanliness takes disproportionately longer to achieve. Specifying the correct grade for the actual service condition, rather than over-specifying by default, is one of the most effective ways to control coating project cost without compromising performance.